Quick Links:
Zen
and Art Home Disclaimer
Errata
Parts and Parts
Vendors
Truck Sales Service
and Repairs
Engine Fuel Hydraulics Radiator and Cooling
Air System Brakes Wheels Tires Electrical
and Batteries
Transmission Clutch
Axles Hubs Body Air
Conditioning
Tools
Safety
Engine
The 1300L used a number of engines during its long production run. Early models used the OM352 motor which is a non-turbocharged motor. This motor, when serviced on regular intervals and not tweaked away from factor specifications on fuel delivery, is highly reliable. But slow. I don't have the horsepower on the tip of my tongue, but it is on the order of 130 hp. That is not much for a 12,000 lb truck. That motor will get you there and back, but at a slower speed. Most Americans are deeply disturbed by not being able to go 70 mph. If you own a mog, particularly a non-turbo mog, you can forget about that velocity as pure fantasy. Your top speed will be 50-55 mph and less on grades. You need to adjust by getting on "mog time" and be patient.
Other motors used on the 1300 were the OM352A, OM366 and OM366A models. Any model with an "A" in it is the turbocharged version. If it has an "LA" suffix, it is the turbocharged and inter-cooled model. I am not aware of any LA versions of the 1300. Other SBUs, yes, but not the 1300.
The motors that come from the factory that have
the "A" suffix have several small, but vitally important changes
to allow safe operation of the turbocharger. First, the A
models have pistons with recesses in them to keep the
compression ratio low.
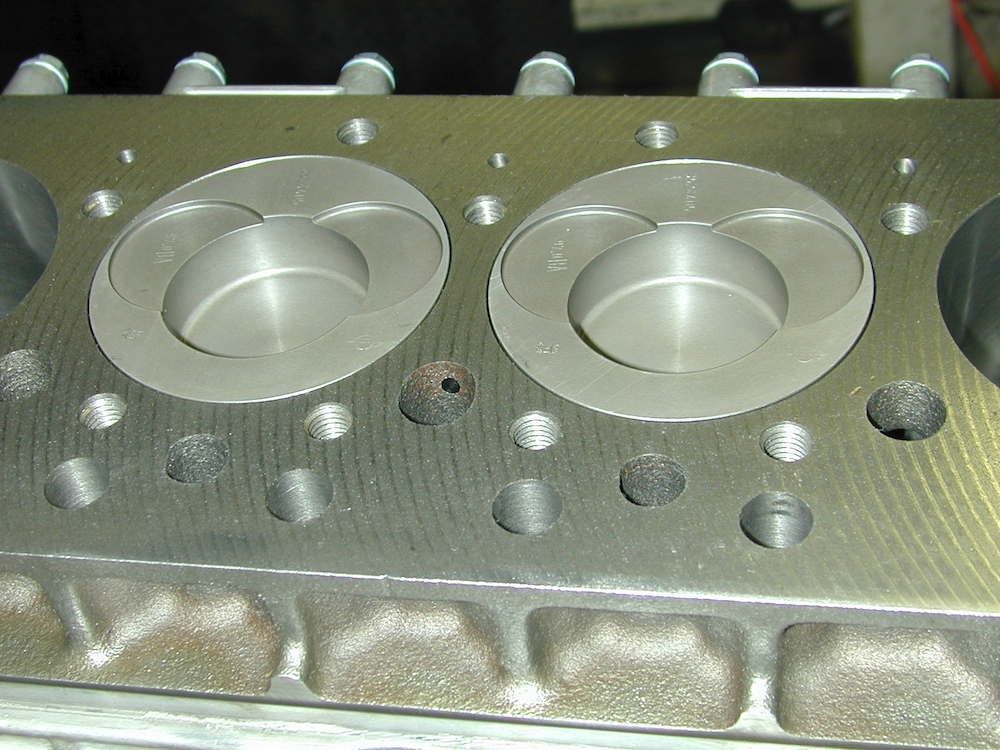
Note the cups in the pistons with recesses for
the valves. This is an OM352A block designed for
turbocharger use.
Second, I believe they have a different number of
piston rings. Third, and most important, they have "oil
squirters" underneath the pistons that spray oil on the pistons
to help dissipate the extra heat of combustion that comes with a
turbo charger. Finally, the oil cooler may be larger on
the "A" model (I am not sure). As a side note, the regular
engine block can be turned into an "A" by drilling and tapping
holes for the squirters if you know where to drill and the
correct thread size/pitch. Consult an expert before
attempting this process as a mistake will ruin your engine
block.
You can, in principle, add a turbocharger to a
regular engine. But, you do so at your own risk. My
mog came with a turbocharger, but we discovered later that this
was added to a standard engine. When the injection pump
was adjusted to bring the fuel delivery to the volume specified
in the shop manual, the motor burned up. Why? No oil
squirters and wrong ring count. The design could not
handle the extra heat and fried. I purchased a new crate
motor from one of the parts vendors. 6 months and $12k
later we were back on the road much smarter about the issues
associated with making engine modifications. I have said
in the past that "there is no learning without pain or money",
so we got smart in a hurry.
The OM-352 is about 5.5 liters with 6 cylinders. Normal maintenance for this motor consists of oil and filter changes at 5k mile intervals. I used Jiffy Lube (or equivalent) to do the oil changes. They make the 14+ quarts of nasty black motor oil go away and if you bring your own oil and filter the cost is reasonable. Particularly since they are the ones getting oily. Walmart has the best prices on diesel grade motor oil. DO NOT use regular motor oil in your truck. ALWAYS use diesel grade, it will be clearly marked on the container. I run Shell Rotella 15-40W but have also run Chevron Delo and Mobil Delvac. Straight 30W works well, but I prefer the multi-viscosity for easier starts in cold weather. I doubt that paying the extra for synthetic oil is worth it. The color of the motor oil would indicate that the oil is getting polluted with combustion products, therefore the oil is getting acids in it. It has been suggested that the accumulation of these contaminants is the real reason you need to change the oil frequently.
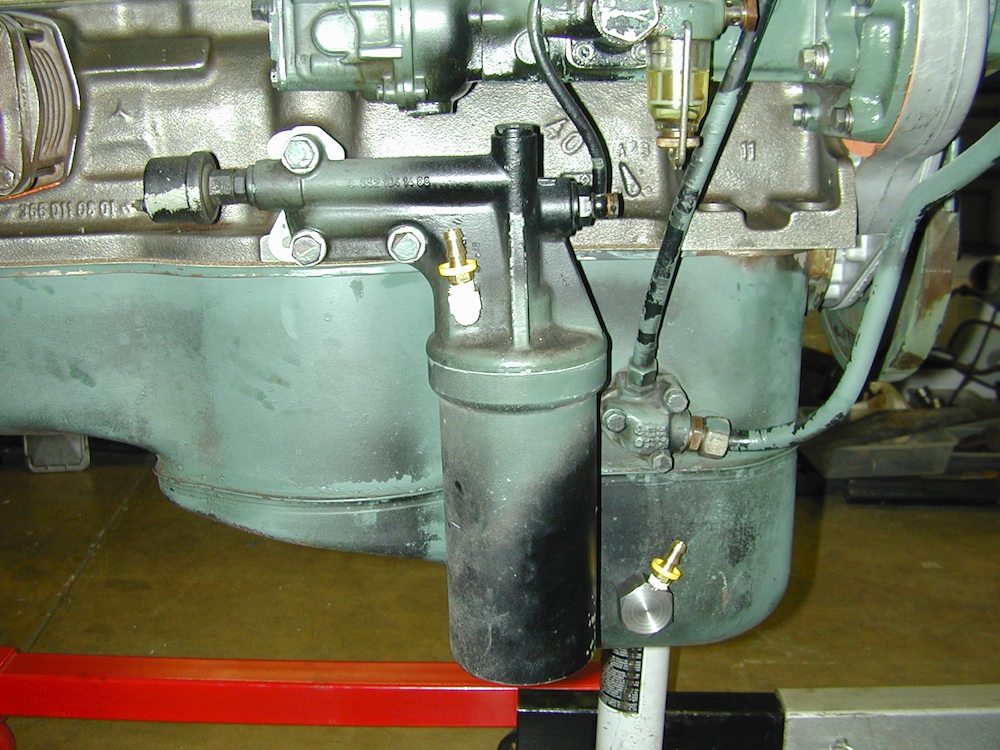
The oil filter can is front and center in the
photo above. The retaining bolt comes in through the
bottom of canister runs through the length of the can and screws
into the housing at the top. The O-ring gasket is in a
groove in the housing. The retaining bolt has a copper
washer which is needed to keep the system from leaking. Be
sure you get the O-ring seated correctly, all copper washers
have been re-installed and that all bolts are snug. The
item at the bottom of the oil pan is a marine pre-luber used to
establish oil pressure in the block before the engine is
started. That bolt came loose about 10 years later leaving
the nut in the oil pan, the oil pan empty and us at the side of
the road in Remotes-ville, Alaska for 2 days.
I suggest contacting your favorite parts vendor and getting a six-pack of oil and fuel filters and carry one each in the truck. If time for an oil change comes and you do not have a filter, no problem. Pull the main plug for the oil pan and drain the pan. Re-install the plug and copper washer and insure it is snug. The oil filter is in a sheet metal can with 2 holes on the bottom. One hole is for the bolt that holds the can on, the other is a drain plug for the canister as it contains about a liter of fluid and it will make a big mess if you don't drain it before removing the retaining bolt. Both have copper washers. You can in a pinch just remove the drain bolt and drain the oil out of the can and then replace the bolt and washer (insuring they are snug but not so tight that you strip it). Refill the motor with the 14-15 quarts required and you are good to go.
Another required maintenance action on the 352 and
366 series is periodic valve adjustments. These
adjustments change over time due to stretching of the
valves. Having them too loose results in really bad engine
performance, hard and smoky starts and poor mileage.
Having them too tight can break a valve which drops the valve
head into the cylinder and hoses the engine block.
So...the adjustments need to be done without fail. If your
rig is relatively new, say less than 50,000 km on the meter, you
should have it done. If you have had the adjustment done
once and another 50-75,000 km has gone by, the adjustment should
be done again. From there, doing it every 150,000km should
be fine. If the motor is showing any of the symptoms
described above, consider having the adjustment checked.
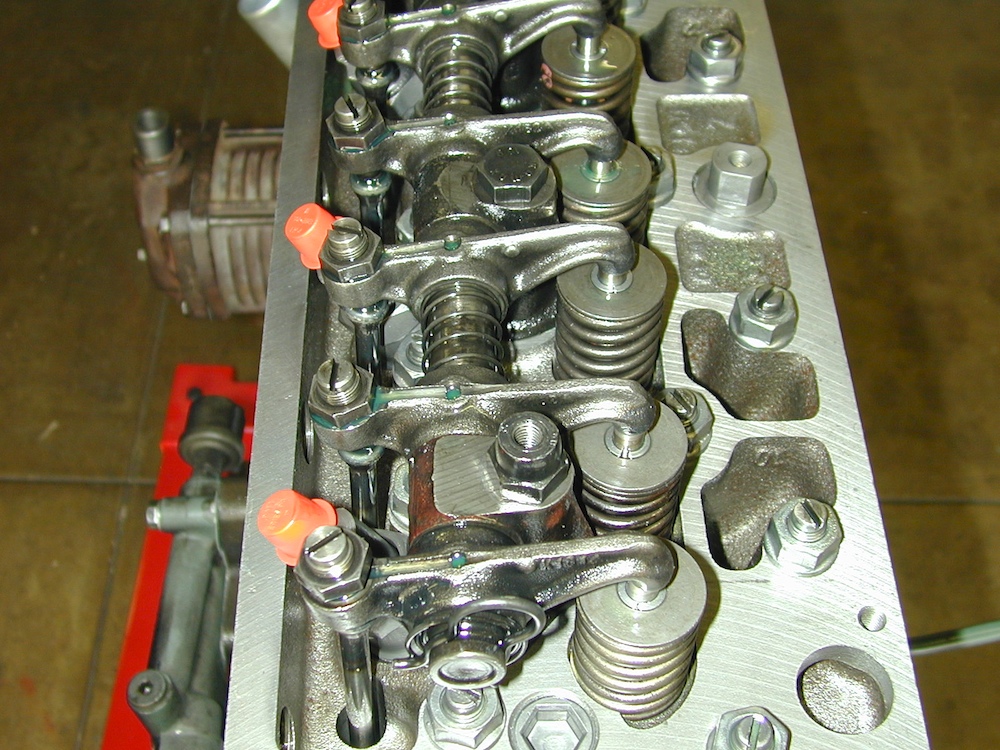
The adjustment process is performed by loosening
the locking nuts and turning the slotted screws to vary the
offset between the top of the valve and the rocker arm.
Consult the shop manual for the specified clearances and the
actual process before attempting this process.
This process requires removing the valve cover, replacing the gasket and a special tool, so it should be done my a qualified diesel mechanic. And you will need the valve setting data to do this effectively. My 1017A which has an OM352A motor had 70,000 km when the first adjustment was done and every valve needed adjusting. The input bank was too loose and the output bank was too tight. Too loose is just bad performance (or in the limiting case, the engine won't run). Too tight risks severe damage to the motor and expensive repairs. Terry Lee Enterprises (Rob Pickering) is known to be able to perform this action. Other service vendors may have this capability as well, so check with them first before scheduling the action. Freightliner should be able to perform this action, but you will likely have to provide them with the adjustment parameters. Again, call first and specifically tell them the model of the engine (and possibly the engine serial number) to determine if they have the required data.
The OM366 engine is close to the 352, but my
understanding is that the crank shaft is different resulting in
a longer stroke and consequencially a slower max RPM. Some
engine components may be common (I believe that later engine
blocks had a 353 or 366 designation in their part number) but
exercise caution if you are attempting to do a build-yourself
Frankenstein engine from scrapped parts.
Fuel
Short of a mechanical failure, few things will stop a diesel motor from running. Fuel is first and foremost on the list of reasons. Dirty fuel, not enough fuel, water in the fuel, air in the fuel are the most common issues that cause a motor from running.
You must change the fuel filter on your truck regularly. How frequently depends on the quality of fuel you have been using, external contaminants, and how much debris there was in your fuel tank when you purchased the truck. In an ideal world, you would have fully drained the tank, had it steam cleaned and chemically treated and then re-installed it on the truck before you operated it for the first time. Things did not work out that way for me and I doubt it did for you. So, we will deal with reality. The typical 1300L has two fuel filters in series. Both filters are the same. The filter kit comes with the filter element, a rubber ring-washer and (depending on the filter vendor) a copper washer.
If your truck is running rough and sputtering, you are likely getting air in the fuel lines. If the truck has poor power, is blowing white smoke, or has hard starts, it is likely a dirty filter.
Air in the fuel lines is harder to find. Usually, it is a pin hole or crack in one of the lines that go from the tank to your injection pump (IP). Also, note that there is a manual fuel priming pump that is used to drive air out of the system after a filter has been changed or any service to the fuel circuit. For the motor to operate correctly, there can be NO air in the fuel lines. Ironically, the priming pump is frequently a source of air in the circuit. The older pumps have a twist-to-lock design where the piston can come unscrewed due to motor vibration. If the pump is old, and it likely will be original on your rig especially if it is ex-military, the piston gasket can leak. This manifests itself as leaking fuel when the pump is actuated but ALSO provides a path for air to be sucked into the lines when the truck is running. This is the very first thing to replace if you are searching for an air leak. The replacement pumps are very cheap and super-easy to replace. The new version has a rubber cap on the top that you press to actuate the piston. If the cap has not been violated or the rubber cracked, then the pump is not the likely source of the air.
Another normal source of air in the fuel is an incorrectly installed fuel filter (poorly seated gasket or lack of a copper washer). The filter is changed by removing the bolt at the top of the filter assembly. This bolt holds the cup in place from the top with a threaded socket in the bottom of the cup. Loosen the bolt and note that there is a copper washer on this bolt. DO NOT LOOSE THIS WASHER. These washers provide the seal that prevents air from getting into the system via the bolt hole in the upper casting. These are metric washers and a trip to your local auto parts store will get you more of them if you lose one. I bought a bunch of them and keep several on my key ring. If you lose the washer, your truck will not run; you will be on the shoe leather express until a tight seal on the fuel system has been established.
When the bolt has been removed, the cup with filter element and fuel can be dropped down to free it from the mounting. You will slosh diesel on your motor, so expect it and wear old clothes and rubber gloves and spray the area with brake cleaner when you are done to remove the diesel. When the cup is free, place the diesel that remains in the cup into a clean container and inspect the bottom of the cup. You will likely see debris there. Pull the filter element out of the cup (it will be sticky) and note the color of the element. If it is pitch-black, it is clogged. In a pinch, you can rinse the element in CLEAN fuel and attempt to re-use the filter. I would only do this in the case where the truck will not run and you have no other filters. YOU NEED TO CARRY AT LEAST ONE SPARE SET (2) OF NEW FILTERS IN THE TRUCK AT ALL TIMES. There is no way to predict when the filters will be clogged even if you think you are purchasing "clean" fuel at freeway truck stops. Sometimes, the worst contamination is comes from rust and scale inside YOUR tank.
There is a rubber gasket that is in the cast housing that is bolted to the block. This gasket seals the interface between the cup and the mounting. Each filter kit has a new gasket. Change the gasket EVERY time. To remove it, use a gasket pick, screw driver or knife to extract the old gasket from the mount. Press the new one in and insure that it is correctly seated. To prevent the gasket from wrinkling when installing the cup, do not turn the cup; let the bolt to the work. A wrinkle in the gasket will generate an air leak. Remove and discard the old filter element, clean the cup with a paper towel or brake cleaner and slide a new element on the spike. Place the cup assembly on the top spike and seat the cup against the mounting. Insure the copper washer is on the bolt and insert the bolt and thread it into place. This bolt needs to be quite snug to prevent air from leaking into the system.
Repeat the process with the other filter
assembly. When both filters have been changed and
reinstalled and tight, you can now bleed the air out of the
system. YOU MUST BLEED THE AIR OUT OF THE SYSTEM or the
truck will not start. There are 3 bleed points on the
typical truck: one each as a petcock or bolt on the top of each
filter mounting and one on the front top corner of the IP.
Some newer motors have a system that self bleeds, but you have
to operate the bleeder pump for "a while" before it removes all
the air from the system.
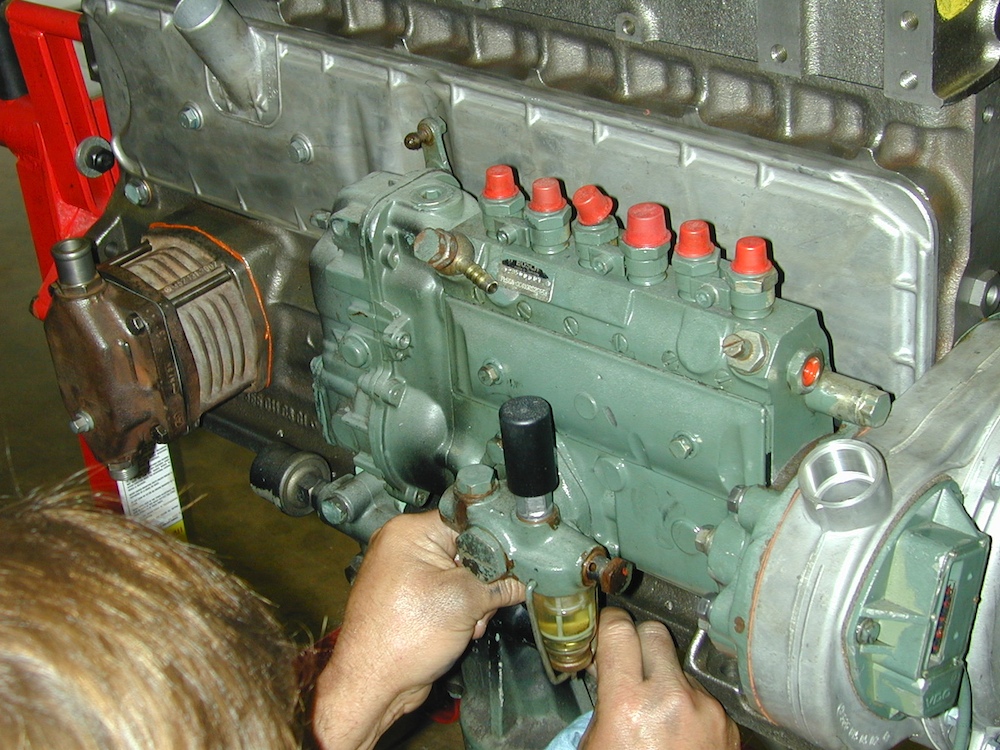
In the photo below (taken while replacing the
diesel motor) there are some key points of interest.
First, the items with the red caps are the outputs of the
injector pump (IP). The IP lines run to the injectors via
precisely measured lengths of tubing. The fuel input for
the IP comes in via the hose barb on the upper left of the
IP. The bleed screw for the IP is on the upper right; it
is the brass bolt with screw slot and locking nut.
Finally, the priming pump is the widget with the black rubber
top on it at the lower center of the IP. The unit to the
left with the hose barbs and fins is the block-mounted air
compressor.
Follow the fuel line from the filter to the priming pump to determine which filter is "first" in the series. Open the petcock on that filter and operate the priming pump. This will fill the first filter. Keep pumping until the fuel runs out WITHOUT ANY BUBBLES. This will make a mess, so if you are doing this in your driveway, put a pan down to catch the overflow. The engine block can be sprayed with brake cleaner later to remove the excess fuel. When the first cup is producing fuel without bubbles (25-50 pumps or so), close the petcock or vent port snugly and repeat on the next cup. When the second cup is flowing fuel without bubbles and the vent is tight, move on to the injection pump. On my truck, the air bleed vent is a brass bolt with a slot in the top. To open this, undo the locking nut with an appropriate wrench and then use a straight blade screwdriver to open the vent. Continue operating the hand pump until the vented fuel has no bubbles. When running clear and no bubbles, tighten the bolt with the screwdriver and tighten the lock nut.
- you did not sufficiently pump the primer;
- you failed to install the copper washer;
- you wrinkled the gasket;
- cups are not tight;
- petcocks are not tight;
- IP vent is not tight.
Of course, there are other possible candidates,
but since you just changed the system, inspect your work
first. Air leaks on the fuel pickup line from the tank can
cause these symptoms. And, an air leak on the gasket for
the primer pump can cause this leak as well. As noted
above, if you have the old-style primer with the screw top, you
should replace it with the new version. The new version is
shown in the photo above; it has a rubber cup on the top.
If this is the case, I suggest doing a visual inspection to see if there are obvious leaks. Check tightness and seating of the cups and cup bolts and insure that the copper washers were not accidentally dropped. Then re-do the bleed procedure and retry. If you are still not happy, then the cups must come off and the seating of the rubber gaskets must be re-verified. Anytime the system is opened, the full bleeding process must be repeated.
For good or bad, you must know how to perform this process on your truck. I have had many instances where I was forced to perform a filter change in a parking lot or at the side of the road because of contaminated fuel. And when that happens, you will be going no further without a filter change. DON'T CONSIDER, EVEN FOR A MOMENT, RUNNING THE TRUCK WITHOUT A FUEL FILTER. You can go from two filters in-line to only one without any risk, although the really long term view of this changes the chance of the injectors getting blocked and requiring replacement. And that process is not one that you will be doing at the side of the road.
The summary to this long-winded diatribe is to change
the fuel filters frequently and before it becomes a
necessity. I suggest changing the fuel filters when you
service the oil.
A parting comment about fuel treatments. I am in favor
of adding fuel treatment, particularly anti-gel, if you are
operating in low temperatures. We live in SoCal so it
never gets "cold" and all the local diesel is
non-winterized. For me, even if running winterized
diesel, I would consider adding anti-gel. I have
determined that adding treatment generally makes the truck run
better and provides a bit better mileage. But, it does
not reduce the COST per mile when you factor in the cost of
the fuel treatment. Sometimes, if you have a fuel filter
that is in a partially clogged condition, adding fuel
treatment can extend the interval to the next filter
change. But, the best solution is to just change the
filter and be done with it.
Quick Links:
Zen
and Art Home Disclaimer
Errata Parts and Parts
Vendors
Truck Sales Service
and Repairs
Engine Fuel Hydraulics Radiator and Cooling
Air System Brakes Wheels Tires Electrical
and Batteries